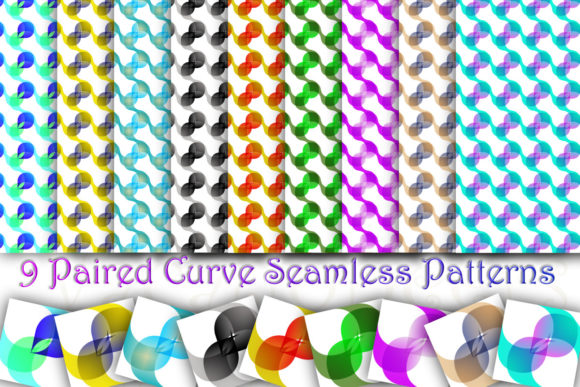
9 Paired Curve Seamless Patterns
If you’ve ever spent hours trying to tile a curved, organic-looking pattern—only to spot misaligned edges, visible seams, or awkward breaks—you know how frustrating it is to settle for “almost seamless.” The 9 Paired Curve Seamless Patterns pack solves that. It’s a curated set of nine individually crafted, truly seamless PNG files—each built around harmonious paired curves that flow naturally across repeats. Designed and rigorously tested in Affinity Designer, these patterns aren’t just visually cohesive; they’re technically reliable for real-world use.
Why These Patterns Stand Out (and Why That Matters)
Most free or mass-produced curve-based patterns rely on basic symmetry or automated tiling tools—leading to repetition that feels mechanical, not organic. The 9 Paired Curve Seamless Patterns were built differently: each pair of curves was hand-aligned, adjusted, and stress-tested at multiple scales and tile sizes. That means no hidden seams when scaled up for large-format prints, no pixel drift when layered in design software, and no unexpected clipping in web CSS backgrounds or Figma auto-layouts.
This attention matters most when your work communicates tone or intention—think branding for wellness studios, packaging for artisanal goods, or digital course slides for creative educators. A subtle but consistent curve rhythm builds visual trust. A jarring repeat breaks it.
A Common Mistake: Assuming “Seamless” Means “Plug-and-Play”
Many users download seamless patterns expecting instant results—then get stuck because their software interprets the PNG’s transparency, bleed, or pixel alignment differently than intended. For example: importing one of the 9 Paired Curve Seamless Patterns into Canva without disabling “auto-resize” can crop the edge pixels critical to the seamlessness. Or applying it as a fill in PowerPoint without setting the background to “tile” (not “stretch”) creates distortion.
The result? A pattern that looks great in preview—but fails silently in delivery. You might ship a client presentation with a subtly misaligned background, print fabric with faint ghost lines, or publish a blog header where the curve flow stutters every 300 pixels.
How to Avoid It
- Check your software’s tiling mode first. In Adobe apps, use “Pattern Overlay” or “Pattern Fill” layers—not regular image layers. In Figma, use “Fill → Pattern” and confirm “Repeat” is selected (not “Fill” or “Fit”).
- Preserve transparency. These PNGs include transparent edges for precise tiling. Don’t convert them to JPG or flatten layers unless absolutely necessary—and if you do, re-test the repeat manually by duplicating and offsetting tiles.
- Test at actual output size. Zoom out to 25% in your editor and scroll across several repeats. If you see any shift in line weight, spacing, or curve continuity, revisit your import settings—not the pattern itself.
Another Overlooked Detail: Scale vs. Intent
Not all curves serve the same purpose. One of the nine patterns features tight, interlocking S-curves ideal for subtle textile textures. Another uses wide, breathing arcs perfect for spacious web banners or slide backgrounds. Yet many users apply the same pattern across wildly different contexts—using a fine-scale motif for a 6-foot trade show backdrop, or a bold, sweeping curve for tiny UI icons.
That mismatch doesn’t break functionality—but it weakens impact. A delicate paired curve lost at 200% scale feels vague. A dramatic curve shrunk to 10% becomes a muddy blob, losing its intentional rhythm entirely.
Better Approach: Match Curve Scale to Use Case
- For print (fabric, stationery, packaging): Start with Patterns #3, #6, or #9—they have medium-to-wide spacing and generous negative space, ensuring clarity even after dye-sublimation or screen printing.
- For digital interfaces (websites, dashboards, apps): Choose Patterns #1, #4, or #7. Their balanced density holds up across retina and standard displays without overwhelming content.
- For presentations or social graphics: Patterns #2 and #8 offer strong directional flow—ideal for guiding attention across headlines or data visualizations.
What to Verify Before Downloading or Using
Before opening that ZIP file, take 60 seconds to confirm three things:
- Your workflow supports PNG transparency. If you’re using older versions of CorelDRAW or certain CMS editors, test one pattern first—some strip alpha channels on upload.
- You understand the license scope. These are for personal and commercial use—including client work—but not for resale as standalone pattern assets or in template marketplaces without significant original modification.
- You’ve noted the resolution. Each file is 3000×3000 px at 72 PPI—a sweet spot for both web flexibility and high-res print prep. No need to resample unless your project demands extreme scaling (e.g., billboard-size); in those cases, test one tile at full size before committing.
When Things Don’t Look Right—Try This First
If a pattern appears misaligned, slightly blurry, or inconsistent in repeat—even though you followed best practices—don’t assume the file is flawed. More often, it’s a software-specific quirk. Try this sequence before reaching out:
- Re-import the original PNG (not a renamed or edited version).
- In your editor, disable any automatic sharpening, anti-aliasing, or “optimize for web” compression during placement.
- Create a new document with dimensions exactly divisible by your tile size (e.g., 1200×800 px for a 200×200 px tile) to eliminate fractional-pixel rounding errors.
- Compare side-by-side with the included preview grid (if provided) or open the file in Affinity Photo/Designer—the native environment used for testing.
If it still doesn’t behave, yes—please contact me. I’ll troubleshoot with your specific software version, OS, and steps taken. Because these patterns were built to work, not just look good.
Final Thought: Seamless Is a Starting Point, Not the Finish Line
Having access to the 9 Paired Curve Seamless Patterns gives you a strong foundation—but the real value comes from how thoughtfully you apply them. A well-chosen curve pattern can soften a tech brand’s sharp edges, add warmth to an educational platform, or unify a product suite through consistent rhythm. What doesn’t help? Applying them uniformly across every asset “just because they’re there.”
So pause before you tile. Ask: Does this curve support the message—or distract from it? Does its scale match the viewer’s distance and device? Does it breathe alongside the text and imagery, or compete with them?
That kind of intentionality—backed by technically sound assets—is what turns functional design into resonant design. And that’s why these nine patterns were made to be used, tested, trusted, and returned to.